söndag 11 december 2016

Models of the week


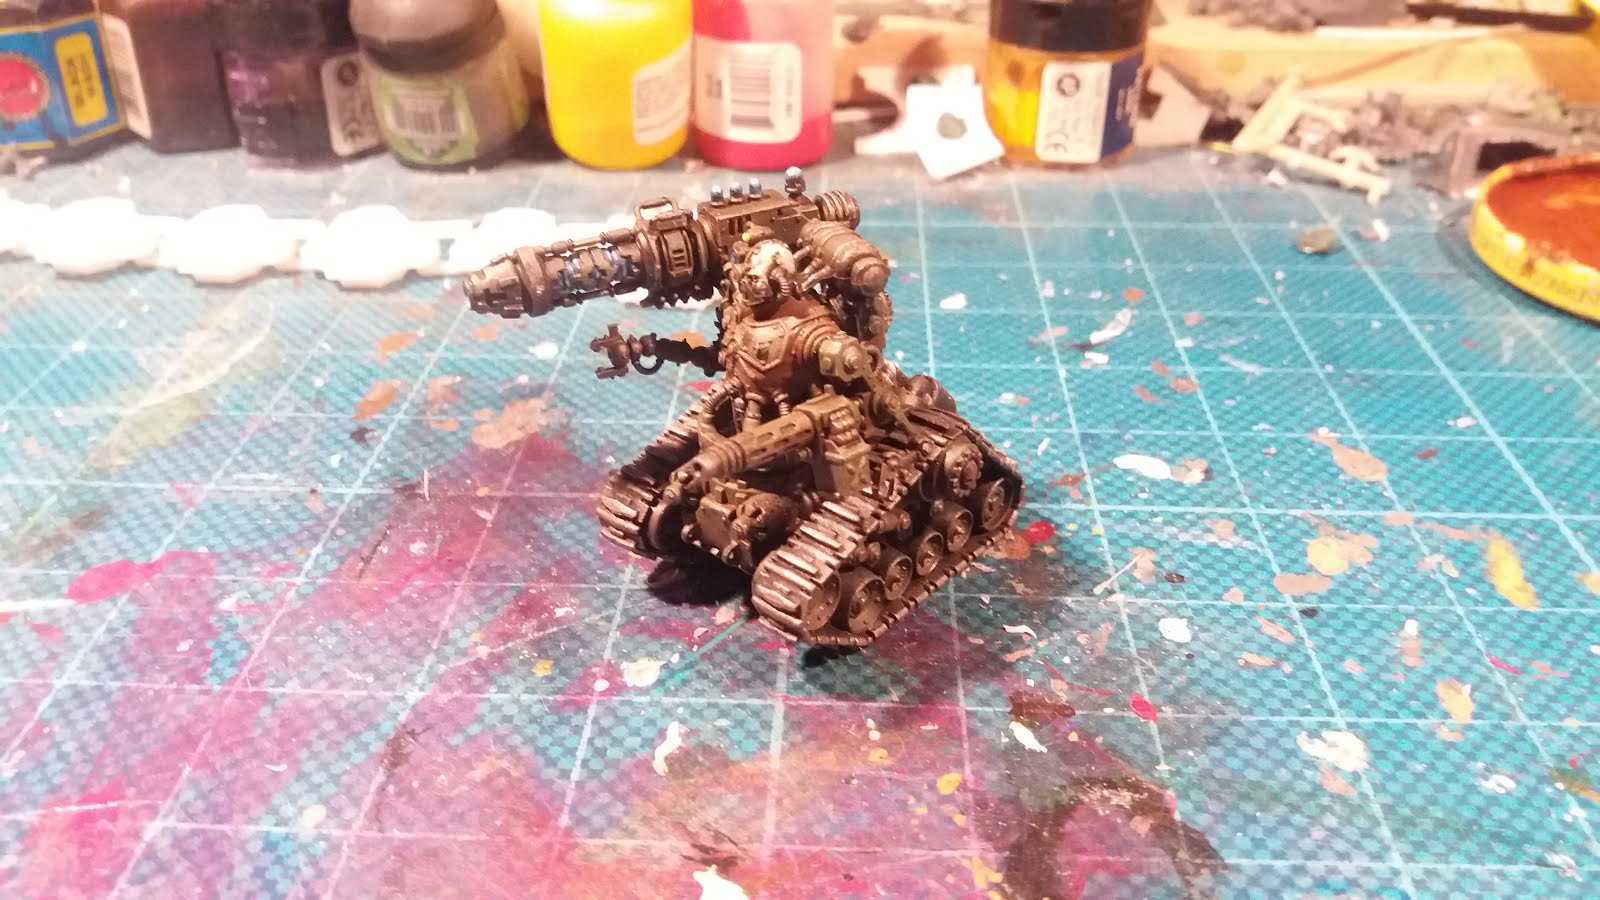
Yet another week has passed and I have managed to get some more models done. This time it is the last of the Skitarii vanguard, the Alpha and a Kataphron. Even though I feel like I have no time for hobby stuff I actually manage to get somethings done which is very pleasing. All in all there is not much to say about these two, the color palette is the same as on the rest of my mechanicum stuff, so it is just the same recipe. I must say that I kind of like the Katapron, initially I did not like the idea of the mechanicum using tracked vehicles, in my opinion they should all be walkers, that being said I really like the model and the level of detail. Sadly the mono-pose character of the models make painting more a bit of a bore. GW really needs to learn how to make multi pose models and still retain the level of details. I understand that it is easier to sculpt a complete model, were the parts only need to fit one pose, but for re-build-ability it is better with multi part kits with interchangeable parts.


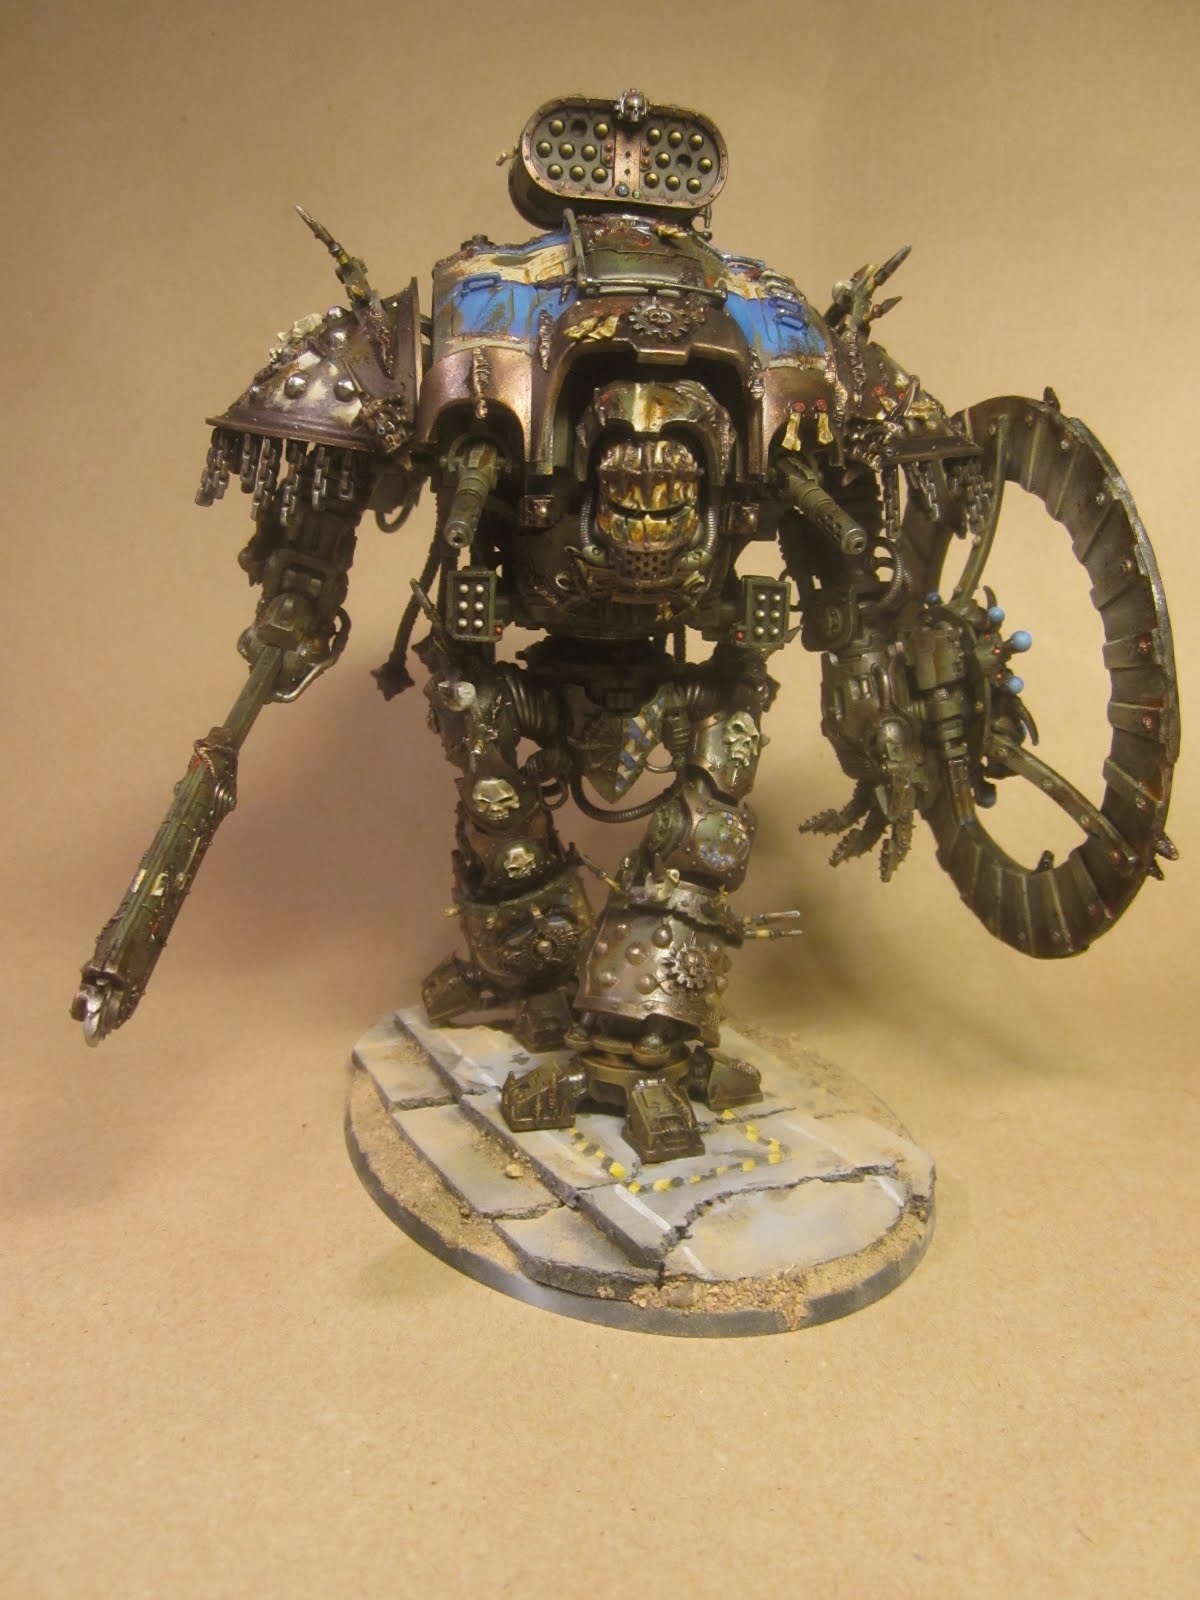
I have also started to put some GS down on Varangian. Here the trick is to go slow and only do a few pieces at a time. Both so that you don't put your fingers on the things you just sculpted, but also to not over do it in one go. Less is more, you have to find the balance. And then off course it is always good to do multi layering with GS as it is much easier to get a good level of detail and depth that way.

söndag 4 december 2016

Progress report


This week has like many other gone to fast. I have however managed to get some things done. It was the last week with the 3D printer so I some time printing duplicates of the knights interiors, some parts for Opus Magna and a crown for Varangian. The crown then got some plastic teeth cut form plasticard. But that is not all, I also assembled the last of the Skitarii that I painted over the last couple of trips away from home, and I managed to paint two models in one session, a Custodian and a Dark Angel. So all in all a productive week, at least compared to a lot of other weeks.


söndag 27 november 2016

Varangian neck chain


Time is flying but sadly my progress with Varangian is not. It is a quest of patience as I need to let my ideas mature. This week I wanted to add a neck chain, hanging between the side armor plates below the head. I have always had the idea to add something like this, either as sculpted emblems on the armor or as a physical chain. But I was not sure exactly how to do this. So it has been bouncing around in my head for a while. Then I came up with the idea that I wanted to try to print something more complex with the 3D printer and also challenge my self a bit with what I can do in CAD. So I decided to make a chain, much like order's chains, with some massive plates held together with links, and to make it as one piece. So after a few hours in front of the PC and a few more hours in the printer I have a fully functioning chain, made all in one piece. I have also added a stand in for another idea that I have, to add a throne crown to the head. None of the pieces shown will be used but it gives a hint of what to expect. I am also thinking about skipping the neck armor and mount something else in the void. This way the head will be the center piece of a circular opening instead of being hidden beneath layers of armor. This gives it a more aggressive look in my opinion.


måndag 21 november 2016


Once again I have tried my hand at painting Space Wolves. And it seams that what ever I do they turn blue. I have been painting Space Wolves since before there were any chapter specific models. My first versions were really dark blue, dry brushed up  to something reminiscent of a blue gray using the "The Fang" and "Fernrisian Grey" or what ever they were named in the 90ths. Not surprisingly they turned up blue. Then later on I tried to paint a darker scheme, using black ink instead of the blue and adding in some "Dawn Stone" and "Administratum Grey", but still ended up with a blue grey color. So when I bought the prospero box I decided that I would paint the charters up as what they are instead of doing some home brewed paint scheme. The models are far to nice to do that. So this time I decided to skip out on the blue gray "Space Wolves" colors and just stick to, Dawn stone, Administratum, white scar and nuln oil. These are pure grays, in a black and white grey scale, so they should yield a slate grey pre heresy color. And it still looks blue grey. Butting the different models next to each other reveal almost no difference...  so what ever I try I end up with blue grey Space Wolves.


måndag 7 november 2016

Varangian WIP


I finally got some time with my Titan over the weekend. Managed to glue on the arm studs (still needs pinning) even though it almost ended in disaster as one of them came off before the glue cured. Luckily it came almost completely off so I could remove it, without damaging the model, and re-glue it. I am also playing around with magnetization of the major shields. I am not happy with how they are sitting as I can not quite manage to get the magnets to connect correctly to the iron washers on the shields. Then I also got to address one of the more stupid things with the model, the toe plates. I can not understand their function. In any real application they would be broken of the moment the titan stepped into some rubble as they are just hanging from the foot ring and would get caught as the titan set its foot down . I am not relay sure what they are protecting either as the steel in the foot ring would be much thicker than these any way, and there is noting beneath them that seams worth protecting otherwise. As it is they will just act as ramps for any infantry, leading up into the vulnerable pistons of the foot. Well as a nod to the old turtle backs I decided that they might actually look good as some pendants hanging form the underside of the main shoulder carapace. Sadly one of the few things I did not get doublets of with this kit was the toe plates, so there are only 8 and one would need 10 to make it with the same distances both back and front. Instead I decided to try to put a pair of main shields on the edges at the back as I have two set (one form each head). To hold everything in place I whipped up some holders in CAD and printed them, taking advantage of the 3D printer I have on lone. Talking about 3D printing, the air intakes I made earlier really fits the titan and helps bring the back up over the head, giving it a more aggressive look. I am also thinking about adding some armor around the lower back area were the entrance platform is. I got some extra biceps guards that I might use, but I need to add the rib armor first and see how they would connect and if it would look any good. Well all in all it is shaping up and I might actually get the torso built to Christmas. Then I can spend the holidays assembling the legs and making the base.

måndag 31 oktober 2016

Custodes and Sister of silence


I just picked up the Burning of Prospero box and just had to build and paint a Custodes and Sister of silence. These are insanely detailed models and great fun to paint. If this is the future of plastics I will not miss resin at all. I went for a bit of an unconventional color scheme as I thought that just making them pure gold would look a bit flat. So instead I went for my trusted recipe of worn white metal as a base and then painted the shoulder pads, graves and plates in gold. It still looks like an golden armor but you can also see the under laying layers. I am pretty happy with these, especially as I painted them at the same time in about four hours, which for me is a bit of speed painting.

söndag 23 oktober 2016

General WIP, knights, warlord and cult mechanicus

This week has been very hectic with me spending the whole week away from home. But I have managed to squeeze some hobby time in. Mostly I have raced to do as much as possible with the 3D printer as I will have to give it up soon. One thing was to re-do the cockpit for the knights. This time I did it as a one piece to get a better fit bet ween the components. Sadly I managed to get some of the measurements wrong when I re-did it. First I managed to get the height of the dividing wall wrong so it did not fit into the knight torso, and I also managed to get the seat to narrow so the pilot did not fit. After some remodeling and quite a lot of swearing (as I had not set up the model for this kind of editing) I managed to fix these two things, just to realize that I also managed to place the dashboard to far back, so the pilot still wont get into the seat, which means one more, and this time really substantial re-modeling again. But at least I now have the basic form down, and if I only can get the front right I might call it on this one and print a few for the future.


One other thing I tested was to make some air intakes for my warlord. It almost looks like the model is missing something on the front of the cooling ducts on the back. The small round air intakes look a bit small, and when examining the model one can actually see that there are some cross-members extruding from the air intakes that are ending with a chamfer that actually lines up to a plane. So by adding some flat pieces to the sides one can get a nice fit to them. As I noted before, printing flat surfaces are not a good idea with the 3D printer as they turn up striped. So I decided to just print the borders for some intake covers and then glue them onto some smooth plasicard. I think this turned out very nice and I like the look of the cooling ridges with these air intake covers. Just need to print another set and make me a second one.


I have also been fielding around with some green stuff on the insides, mostly filling in gapes etc so there is not much to see at the moment. I have also worked a little on the weapon servitors, were they are getting attached to some wires etc.


Doing all these things in a short time is actually quite stressful, so to relax I painted a mechanicum electro priest. So all in all I have not done much but a little on many things.


When putting models next to the War Lord torso one realizes that it is actually not much bigger than a standard building.

söndag 16 oktober 2016

WIP: Varangian insides


This week there really was not much time for doing any hobby stuff. But I managed to get some time in with the Varangian to finish the internal build. So there you have it, All the pieces are built, now they should be green stuffed and have a lot of detail added. This also means that I can move forward with the actual build of the Varangian as I do not need to fit stuff inside and hence, the torso can start to bulk out. There is only one thing that I have not decided on. As the roof is not glued down there is no connection between the shoulders apart form the walls. I think the walls will be enough once all the shoulder parts are glued in, they make up quite a solid network of resin. I had prepared to add a cross member going from one side to the other with a threaded rod that could be removed. This will however pierce the mechanicum panel at the top, so I am a but out on if I should add it or not. I could always add some "hocks" to the side of the roof that goes down over the sides to keep them from bulging outward. I will let it sit or the week as I will not have time to work on it and decide how to proceed next weekend.


onsdag 12 oktober 2016

3D follow up


I have now painted my first 3D printed test interior for the imperial knights (very sloppy 30 min paint job as it will not be used). One thing that is directly obvious with the print is that the layers are clearly visible on any "smooth" surfaces, especially when dry brushing. Thing are a little better if there are lots of details etc. This is a raw print, i.e. I have not done any post processing to smooth it out or to enhance the detail quality. From a distance it looks ok, and I think that with some filing and green stuffing this could be a great method to at least get a skeleton in for custom work, which would help a lot with symmetry, scale etc.
Next up is to change the nozzle of the printer to a smaller bore and see if this helps with the detail level. I will probably only print parts of it again for comparison. Other things I could mess around with are a tone of settings for the printer and also the calibration of distance from the base to the nozzle. In the end it might also be that the high impact polystyreen is not an ideal plastic for printing and that a "smoother" plastic would give better results. This is also something I might try if I have the time.

I will also play around a bit with the design, keep the parts that came out ok and redesign the parts where the printer could not get the details right. I will also try to make it more of a one piece to help keep things in the right place. For final design though, one I know that everything fits nicely I might break it up again for ease of painting.

I will also try out some hybrid schemes with details like borders, insignia, bolts and such printed and then glued to plasticard, Similar to what I did for the shield of the close combat knight but more consistently (on the shield I only used printed nuts)


måndag 10 oktober 2016

WIP, 3D print


So, after finishing the design of the Knight interior I spent the evening having the printer push it all out. Sadly it does not really fit into the Knight, so some measurements needs to be adjusted. There are other things to That I will change for the next run. One thing I noticed on the printer though is that the calibration of the nozzle is really important as it tends to smear the layer below if not done correctly. I might also try a smaller size nozzle and see if that improves the detail level. All in all it was a fun experiment and show that it is possible to print decent structures for modeling. In the end I think a combination between plasticard, green stuff and 3D printing might be the way to go, where each medium has it own strengths.

söndag 9 oktober 2016

Unexpected developments


Well, I have been thinking about sculpting vs CAD + 3D printing lately, as I do not feel that the things I sculpt is not really sharp enough. So the other day a friend of mine said that I could borrow his 3D printer as he was not going to use it for a month or so, which means I get to play around with it a bit. So I decided that since I already have built the interior to the knights I might as well take these pieces, measure them and put them into CAD. A few hours later I have some sort of preliminary rendering, now I just need to test print them and see how it looks and also how it fits into the knight. I will get back with the results. And if it turnes out to work, I will just have to design the rest of the pieces that I have now sculpted for the knights and I will have a means to rapidly turn out knight interiors. In this case I should also probably by some of the FW pilots and make sure that they fit in the throne.

söndag 2 oktober 2016

Fallen / Pre heresy Dark Angels and Varangian insides

After finishing the War Dancer I cleaned the palette by painting a Pre heresy / fallen Dark Angel. I find this paint scheme quite easy and relaxing and I can do a model in about two to three hours Sadly the camera does not do them justice as it has a hard time with the colors with the lighting that I use. The black comes out to shiny compared to IRL, and it pics up some of the pigments better than others, making the transitions look rougher than what they are.


I have also worked a little bit on the Varangian, filling in the last blocks of the inside and cutting them down to fit with the lid on. So now I can have everything in place on the inside and still close the lid. That means I can start with the detailing, finishing this part of the build, not that I will be done in a hurry, but it was one of the big questions marks on this build. The rest of the modifications will be pretty basic with GS sculpting and some minor re-shuffling of some pieces. 

tisdag 27 september 2016

Fallen Imperial War Dancer; CCW Knight

After the last blog post I got inspired and decided to finish of the CCW knight, aka War Dancer, with the missile launcher on the back, the melta guns and off course, the pilot. i think it turned out ok. It is not the best conversion work as I might have rushed it a bit to get to painting (or I am no better). This also goes for part of the paint work. From a distance it looks great, and also under natural light, but when photographed at close up one can see that it is not as neat as it might have been. This might have to do with me finding it harder to focus my eyes when painting and I thing the lighting in the hobby room needs some attention, or it is just me getting old and sloppy.

Well that is what it is. It will be better next time.

When it comes to the over all pose I am happy with the leg conversion. Just turning the joints at the hips upside down worked well. There where some issues with the pistons and cables, and there was absolutely no room for the banner but it gives the knight a different look, taking it away from the standard model. I think it looks more like the FW knights as the gate is more natural and it also give the knight a more menacing look.The addition of chains to the underside of the shoulder guard also worked out fine. I am however not to sold on the arcs with the spikes. I thin k the work on the shoulders and legs but the set on the hips really interferes with the torso. In a way that is good as it prevents the top form falling of due the imbalance caused by the shield. Which by the way is magnetized as I did not know if it would look to much out of place. The tentacles hanging from the back are also a bit out of place, and attaching them to the exhaust stacks were not such a good idea as it made the it hard to get them into the right place which in turn makes it hard to mount and remove the back carapace. The halberd sword turned out great and I think it was a good idea not to have two of them as I initially planed. Once again it could have been made neater, and I might have to remount the back balance as it is a bit squired.

With some hind sight I might have done somethings differently but over all I think it will make a worth addition to the Northern Ghosts, or the Legio Umbra Borealis.