söndag 21 augusti 2016

WIP, CCW and Varangian


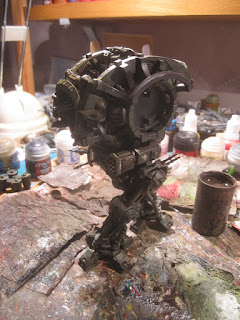
Not much to say really. I am working with the assembly of the Varangian torso at the same time that I am painting on the CCW knight. Painting is more or less my standard recipe now, so it is just going through the motion.

On the Varanginan I have to think a bit more. I have now assembled the rest of the side walls on the torso and pinned them with paperclips. Once the walls were tone I stated on the roof. Since it will be removable I decided to do it as one piece, with the lid and the intakes, ridges and exhausts. Here it is important to make sure the ridges are not to wide (I actually had to warm them and press them together somewhat), as they do not have much space to attach to on the side of the lid (there are very shallow groves that they need to fit into). Hopefully I will be able to fit this onto the rest without ending up in some catch 22 scenario of one piece needing to be there before the rest etc... Once I see that this works I need to remove the ridges on the underside of the roof, to make space for the interior. I wanted to wait with this until the ridges were in place so that I do not deform the roof plate.


torsdag 18 augusti 2016

Update CCW and Varangian


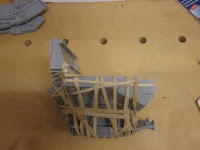
Things are moving, both on the Varangian as well as on the CCW knight. As I did not come up with any thing that needed fixing at the bottom of the Warlord torso I decided to go ahead and start gluing. With the amount of dry-fitting I have done I thought that I knew how to assemble it. So I decided to start with the back wall and get everything centered. Bad Idea. once it is there you cant mount the sides, luckily I noticed this before leaving everything to dry. So I went a head and glued in the side pieces also, and to get the right spacing I also put in the front piece, and then suddenly I had the whole bottom part of the torso glued. I tried to use clamps to hold everything together but in the end I ended up wrapping it with rubber bands. Now I will glue the back piece in and the side walls. Then I can finish the inside build and start with detailing, both on the inside and outside.


When I am not working on the warlord I am painting on the CCW knight. I have now finished most of the insides, cockpit and engine compartment with turbines. The outside is also done and I have moved on to the legs which are now base painted green and are awaiting shipping, grease and rust.


And sometimes I do not know why I paint some of the things I do, I mean the whole inside of the knight will not be seen unless I take it a part (but that was also part of the modeling experience). So all the hazard stripes etc is a bit over kill, but I can still justify it a bit as the top carapace can be removed also for exhibition purposes. But then we have things like the numbers on the sides of the turbines, they will never be seen again once these go into the knight, so why paint them?

söndag 14 augusti 2016

Varangian WIP


Slowly but steadily the insides of the Varangian are taking shape. I have added some more detail to the bottom parts, including the doors that I had to custom make. I also worked on the upper side panels, adding the niches for the weapon servitors. I think I have now come as far as I can without gluing the torso together, but I will let it rest a day or two until I do that so that I am sure I do not need to make any measurements or so at the bottom. Once the torso is glued together I can start to make the final adjustments to the panels, making cut outs etc to fit more snugly. Once that is done I will make the reactors, which is just in mock up in the pictures at the moment. Then I think I will be done with the major build for the inside and I can start with detailing, which hopefully will not be to much since I used as much of the terrain kit as possible. I am very happy with the progress and even if it is not exactly as I had planed it I think it is shaping up nicely.


måndag 8 augusti 2016

Varangian WIP


Finally, I have started to work on the Varangian, warlord of the Nothern Ghosts. As I am building an interior for my warlord I started out with the torso pieces. First of was some drilling and magnetizing for the waist and the head. Used a 10 mm/0.8 kg magnet for the head and a 20 mm/10 kg magnet for the waist. Then it was on to the torso assembly. After several dry fittings I realized that things were not as straight as they appeared to out came the hair dryer. After some individual tweaking I dry fitted the whole torso and wrapped it in masking tejp. Then I put the hair dryer to one of the rear vents and filled it up with hot air, Then I gently squeezed the whole assembly so that any gaps closed. This was then fine tuned after taking it apart and gently warming one part and pressing it against it cool mate. This worked out fine and the fit between the parts is now so god that the glue I will use to assemble it might actually fill them so I do not need to green stuff it.
Once I was satisfied that the parts were coming together in the right way I started to work on the interior. I had some ideas of what it might look like but once I started with the manufactorium parts I sort of just went with it and used as much of those parts as I could, even for things I initially thought I would use plasticard for. All in all I think it is coming together nicely, and once I have lower internal parts done I will assemble the bottom and start moving upwards. All the internal panels will be painted separately but I need to make sure they can be moved in and out. I will have to build some custom stuff but I thought I would try to use as much molded plastic as I can and hope that there is some margin in what weight the legs can take.


fredag 5 augusti 2016

CCW inside WIP


After spraying the CCW knight I could not hold back from some painting, so I started out with the inside. This time I went with a lither green-white inside the knight instead of using the same green brown of the outside as I did on the first knight. This was inspired by John over on 40k hobby blog who has also made some really nice interiors for his knight. Well all in all it is not much to say really. My GS sculpting is not so good which translates into the detail of the knight. Not much of this will be seen any way but I have learned a few things that I will implement for the other knights. One thing being, that all panels with buttons and lights etc should be made separate and then mounted in the knight instead of being sculpted in place. Now I have assembled the torso and need to wait for it to set before moving on.

onsdag 3 augusti 2016

Close combat knight and Warlord plans

Hi there. Lately I have actually managed to get some hobby time in. Mostly I have been working on the close combat knight and planing the warlord build. The later I have realized will require some serious thinking before I do any more than clean up work, which I have done for all the major parts for the torso, as this will be the first thing that I build as I will also build the interior. As for the knight I have finished all the green stuff work and have broken it down for paint, there are quite a lot of different components that goes into this one. No I will just spray it and start painting.
When it comes to the warlord I am currently playing around with different ideas of how to build the interior and what need to be there. I am planing to a use some of the manufactorium scenery parts for some of the interior, but much will be pasticard and green stuff. I also would like the interior to make some sense as to different parts and their location in relation to things on the outside. As the entrance to the titan is from the back and you need to get to the head there is no way around the fact that you need some sort of path going straight through the titan preventing a large reactor to be placed in the middle. So I am thinking about housing the reactors at the back beneath the cooling vents and ventilation conducts. This would mean that the reactors would be in mostly the same position as in the reaver, which makes kind of sens but breaks with the fluff which states that the reactor is in the center instead of the rear. I will throw things around a bit but there is not much space in the lower part of the torso, there also need to be space for four weapons servitors. Since there will be an interior I will also need to come up with a way to stabilize the side walls where the arms and shoulders are mounted as there will be quite a lot of weight there and the roof will not be there to complete the box as intended. Most likely I will put in some steel rods going across from arm to arm once the interior is in place, I just need to play around with the bits a bit to get a feel for what I can do. Once this is under way will start building the legs which will also be an undertaking as I am planing a scenic base for this one, which of course influences the stance and the legs. One thing I learned from my warhounds is that resin is flexible over time, so even if I can make a cool stance and everything is holding up now, things might start being over time, so I need to make sure that I do not over stress anything with my modifications.
Well that is it for now, but it feels good to finally have started on the warlord, even if there is some time yet until paint time.